Tips For Moving in Japan

Moving in Japan and have no idea what to do? Read on to learn how to get the best rate from Japanese moving companies!

Step One: Call two or three moving companies to visit your place to give an estimate. If possible have them all come on the same day (at different times).

Getting an estimate involves a representative from the moving company viewing your house and taking a look at the amount of objects you need to be moved. This usually takes about 10-15 minutes.

Step Two: Once you receive the estimate, mention that you are consulting with other moving companies. They will lower their prices to be more competitive. You can also tell the movers what other moving companies are willing to offer.  They will lower their prices even more.

Step Three: Do not commit to anything at the time of the estimate (unless its insanely good). Most moving companies will call you after the estimate has taken place (usually an hour or so later) and offer you a lower rate. The pressure will usually be on at that time and they will say something like “We can only offer this price for the next four hours.” This is the best time to strike.  

Moving companies will also be very flexible in their negotiations. For example, they will offer to move all of your large furniture at an a very low price, but will not move any boxes. (This could be a good deal for anyone who has a friend with a car).

I have moved twice in Japan and I negotiated the move of my one-bedroom apartment from an estimate of $400 dollars to $200. My husband and I negotiated the move of our 3- bedroom apartment from $1000 to $700 dollars.

Don’t be afraid to haggle for  a good price. It is common practice in the moving world!


Buying a Condo in Japan: Remodeling

This is a bonus post in my five part series “Buying a Condo in Japan.” Check out parts one, two, three, four, and five.

Our condo unit offered a few-add on options such as a bigger bathtub, wider counter-tops, dishwasher installation, and a few other features that would enhance the unit. We decided to install an internal dishwasher.  The dishwasher and installation would cost 600,000 yen ($6,000) which was quite expensive for us. Dishwashers are not common in Japan and the must common types are small external dishwashers that sit on the counter-top. We debated between getting a much cheaper dishwasher from an electronics store or getting the condo add-on. In the end we went with the condo add- on because it it would have the same wood paneling as the rest of the kitchen (which would make the kitchen and condo unit easier to sell in Japan) and it would be internally installed so we would have more counter space.

017a45467b49d10500e59bac0d8c0a8afae655f672

Our dishwasher

01ee74676ad32569228dab5e2c1630a40d3198b4cc

It’s quite small compared to American dishwashers (about half the size). Its about as long as two of my hands.


We also bought and installed drawers, a counter- top, and shelving unit from IKEA.

0145d27f6f3fdb3ec94a8d1b59509b0020808481a6

Our drawers and counter-top from IKEA.

019341abfb5355b4493638ea920da592c5c7d99f59

IKEA installed everything. It was a bit too difficult for us to do on our own.

With that our home was complete!


Want to take a quick look around my condo? Check out these posts here:

My Entryway

The Porch

The Bathroom

The Bedroom


Buying a Condo in Japan: Part Five

This is the final part in the series “Buying a Condo in Japan” Check out parts one, two, three, and four.

Part Five Synopsis:

  1. We have the walk- through
  2. We get lots of tutorials on all of the electronics and features of our condo unit
  3. We get our keys, contracts, and user manuals
  4. The condo is officially ours!

The next step in the process of buying the condo was visiting our actual unit to make sure everything was in working order and to file complaints if we saw anything wrong (like torn wallpaper, scoffed floors, and/or cracked tiles). We also got tutorials for all of the features of the unit such as the security system and various electronic features. It was very thorough and maybe a little unnecessary as we could just read the manuals, but it really made an impression that the condo company wanted us to truly understand how everything worked.

The walk-through was held on a weekend and all of the owners of the condo unit had to schedule a time during that weekend to do the walk-through.  (As it was a new condo all the owners were moving in at about the same time.) Masa and I brought along Masa’s parents to help us out as they were our Japanese home-owner experts. The walk-through went well. Masa’s dad noticed that our entry gate was a little wobbly so we wrote that down on the form. (It was fixed the next day).

01b280f17456bceceefa5625c0cde657ed0c4b67ac

Our shoe closet near the front door. It’s very big for Japanese standards.

01ec89c9b5396f235a0afb29d3705df0e13ead02fe

Bathtub seemed totally fine!

015c22561a9cf8bd16a126b4bf20ae106d9d0a3a42

Hey y’all! Just taking a picture in the shower room mirror.  Why do all Japanese shower rooms have mirrors?!

0100d29a7be2e67e82c455734717611b9247f3c540

Our tatami room

0187c156cb6d124d9ad76de9c486a5d189e77c20fe

Our kitchen sink and stove.

After the walk-through we had our  tutorial session which was a bit tedious as our apartment has lots of electronic features: heated floors, a digital post box, an IH stove top, a complicated gas system, and an even more complicated shower system. Check out this post to learn all about the cool features of our shower room  or watch the video here.

Once the walk-through and tutorial session was complete we received our keys, a copy of the huge rules and regulation book, and a huge binder that was full of user manuals for EVERYTHING in the condo unit: floors, doors, security system, shower room and so much more.

The condo was officially ours!

Want to take a quick look around my condo? Check out these posts here:

My Entryway

The Porch

The Bathroom

The Bedroom


Buying a Condo in Japan: Part Four

This is part four in the “Buying a Condo in Japan series.” Check out parts 1, 2, and 3.

Part Four Synopsis:

  1. We have our contract meeting with the condo company
  2. We go over the rules and regulations of the building
  3. We go over insurance policies
  4. We pledge that we aren’t in the mafia
  5. We fill out more paperwork

The next step in the process to buy the condo was the contract meeting (which took about 2 hours). The meeting consisted of going over various contracts and reading 2 or 3 huge handbooks with the real estate agent. This was by far the most interesting and eye-opening part of the process.  During this meeting the condo company is legally obligated to go over all of the architectural details of the building, and prove that they are a legitimate real estate company (by showing lots of documents). We also read the huge rules and regulations book of the condominium which had typical rules like: pets are okay, no loud music, let the condo association know if you plan to sublet, don’t throw objects off the balcony, etc. ).   We stamped the books with our family seal and signed them once we were finished reading them.  We also had a representative from the insurance company go over the insurance policies for fire and earthquake insurance. We also choose our parking space. It was a long and tedious meeting but extremely informative.

Towards the end of the meeting we had to sign a document stating that we weren’t in the mafia. I thought it was pretty funny but I can understand them not wanting the Yakuza in their condo.

At the end of the meeting we signed  all the final paperwork and the condo was technically ours, but we couldn’t move in until we had the official walk-through with the condo company (more about that in part 5). 

Buying a Condo in Japan: Part Three

This is part three in the series “Buying a condo in Japan” Check out parts one and two.

Part Three Synopsis:

  1. We visit four banks to get screened for mortgage loans.
  2. We fill out lots of paperwork.
  3. We learn about different types of loan plans and decide what works best for us.
  4. We notify the condo company of our approval and do more paperwork.
  5. We pay the initial fee of 2 million yen ($20,000).

Our next step was the mortgage screening. Getting screened for a mortgage is pretty tedious and boring. Moreover, I was not even a factor or consideration in the screening because I was not a permanent resident so we couldn’t include my salary into the equation.

Masa and I went to four banks to be screened during the weekend.(Many banks are open on the weekend for loan screenings or will open on a weekend if you make an appointment for it). The first bank we visited was a labor union bank. This bank had the best mortgage rates because they offer especially good rates to employees of the company where Masa works.  The second bank we visited was connected to the condominium company and had mid level rates. Banks #3 and #4 were banks that had very easy screening processes but very high rates.

The screening process consists of filling out documents with your company information, your salary, and other personal information as well as give the bank paperwork given to you from the condo company.  You also get a run down of the different types of plans and payment rates for loans at each bank.  Some payment plans involved paying off most of the interest first, while some payment plans involved paying the loan off first and then paying off the interest later. You could also choose a fixed rate mortgage with high rates, or a mortgage with low rates but the rates would be subject to change every few years or so.  The screening meeting usually took between 60-90 minutes.

01146d94d04ef68e8616164dfcf7817fa515466e84

A break down of how much the mortgage on thirty million yen home would be.   Monthly payments would be about 65,000 yen ($650) with a 35 year loan,  8% interest, and 100,000 yen ($1,000) twice-yearly bonus payment.

We ended up not getting approved by the bank with the best rates, but got approved by the other three.  We chose the bank the with the mid level rates. We chose our payment plan which included a mortgage with a 10 year fixed rate. We also decided to do bonus payments as well. This means that whenever Masa gets a bonus (which is twice a year), about 50%  of the bonus would go toward paying off the mortgage. Our monthly condo maintenance fees plus mortgage actually turned out to be less than the cost of the monthly rent of our apartment.

Once we got approved we notified the condo company. They sent over more paper work for us to give to the bank. We later went back to the bank and filled out dozens of documents confirming the mortgage rate, life insurance forms (if Masa passes away we are not liable to finish paying off the mortgage), and other insurance forms.   We also payed the loan fees (about 900,000 yen {$9,000} which was a part of the 2 million yen {$20,000} initial fee.)

As we had been approved for the loan, we payed the initial fee for the condo (about 900,000 yen {$9,000} which was the remainder of the 2 million yen {$20,000} initial fee).

The condo was one step closer to being ours!


Buying a Condo in Japan: Part Two

This is part two in the blog series “Buying a condo in Japan”. Check out part one here.

Part Two Synopsis:

  1. We have the second meeting
  2. We  are surprised by the initial costs that come with buying a condo even though there was no down payment.
  3. We reserve the unit by providing income statements, paying the application fee, and filling out some paper work. 


Masa’s mother went with us to the second meeting as we thought it would be a good idea to have an actual Japanese person there to make sure everything was legit. During the week prior to the meeting,  Masa and I poured over the floor plans and prices, debating which condo unit would work best for us.  We eventually settled on the D-model which has a/c installation available for all rooms and was the biggest of all the condos in the building. 

The units varied by price by floor (the upper floors were more expensive than the lower floors) and wood color (condo units built with lighter colored wood for doors were more expensive).  We chose a mid-level room with darker wood.

During the second meeting we got down to the brass tacks. We went over the cost breakdown of what the condo would cost with a typical Japanese mortgage of 35 years, and went over other fees such as the condo management costs (管理費), the condo savings fund( 積立金) (a fund used for future repairs and renovations), a deposit, processing fees, loan fees, and insurances. All of these extra costs would have to be paid before we moved in.  We were attracted to the condo because there was no down payment, but were surprised that we would have to pay 2 million yen ($20,000) upfront. Even Masa’s mother was surprised due to the wording of the “no down payment deal” written on the flyer.   Masa and I took a sidebar and discussed if we wanted to take the meeting anything further.  We decided yes, just to hear what other steps there would be.  We were told that we would have to be screened by a bank to get approved for the mortgage. Once we got approved we would pay the initial charges, sign some contracts, and the condo would be ours. 

013aa14384cab4e73c67b387d9505d60f6c28fcff4

A list of all of the initial fees. 963, 500 yen ($9,630) would go toward initial fees for the condominium unit, and 885, 500 yen ($8,850) would go toward loan fees.

We got home that night and seriously considered what we should do. Should we go ahead with the down payment even though we were initially told there wasn’t one? After much deliberation we decided to go on ahead with it. The features of the home were too good to miss and the location of the home was great.  The down payment of the home wasn’t as much as a typical home in the states would cost us too.

We went back to the office sometime later in the week and signed paperwork that would reserve the unit we chose, and payed a 100,000 yen ($1000) application fee. We also had to provide Masa’s income statements (which we got from city hall) to prove that we could afford the condo.

The condo was one step closer to being ours!

Have questions about the Japanese? Leave a message in the comments.

Buying a Condo in Japan: Part One

Here is part one in the series “Buying a condo in Japan.”

Part One Synopsis

  1. We get a flyer advertising a new condominium being built in the area
  2. We visit the model home
  3. We meet the real estate agent and hear the sales pitch
  4. We schedule another meeting

My husband Masa and I, bought our first home (condominium)  in 2014.  The process of buying a home in Japan was a great learning experience and I am happy to be able to share it here on my blog.

Our journey may be a little different from other expats as my husband has dual citizenship (Japanese and American) which definitely makes the process easier.  (You usually have to be a citizen or have permanent residency to get approved for a loan). We also bought a newly built condo so we bought from the company that built the condo and not a person selling their condo.  The process of buying the condo was pretty easy and quick and I hope it will be the same for any expats who are looking to buy a condo.

The process of buying a home began when we got a flyer in the mail about a new condo being built near our home. Our friends back home in America were all buying their first homes and Masa had definitely caught the “I want to be a homeowner” bug.  I was perfectly fine with just renting a home, but I loved looking at model homes as it was  a favorite past-time I developed with my family when we visited model homes every Sunday after church when  I was in my early teens.

015b8b9f4b1e0aa9483add35c55d086b2ca555a405

A sampling of the flyer

We drove over to the model home on a Saturday. Japanese model homes are usually quickly built wooden model homes that soon get demolished after they have finished selling the homes or units at the actual site.  In the model home we visited, the 1st floor was the office and the 2nd floor was a model of one of the condo units.


We entered the first floor office and were greeted by a man who turned out to be a real estate agent as well as an architect for the condo company. He sat us down, gave us a few brochures, and went over the sales pitch. What initially had drawn us to the condo was that there was no down payment necessary and the real estate agent went over that deal as well as pricing, and the floor plan of the four different types of condo units in the mansion. After we listened to the sales pitch for about 30 minutes we headed upstairs to see the model home.  

It was, of course, beautifully decorated. It had very nice features like a sink installed on the veranda, a very nice shower room, and a spacious living room.  The real estate agent left us alone in the model home for a bit which was nice because we felt more comfortable looking around on our own. We headed back downstairs once we finished looking, and the agent finished up his sales pitch- mentioning that homes were going fast (this turned out not to be true, but hey-it’s a sales pitch), and gave us a price list of the available units in the condo.

Here is the flow-chart going over the process of buying a condo which was given to us by the condo company. (Translation Below)

01a1e7501a568348a3b60a2bbebb271066fe510de0


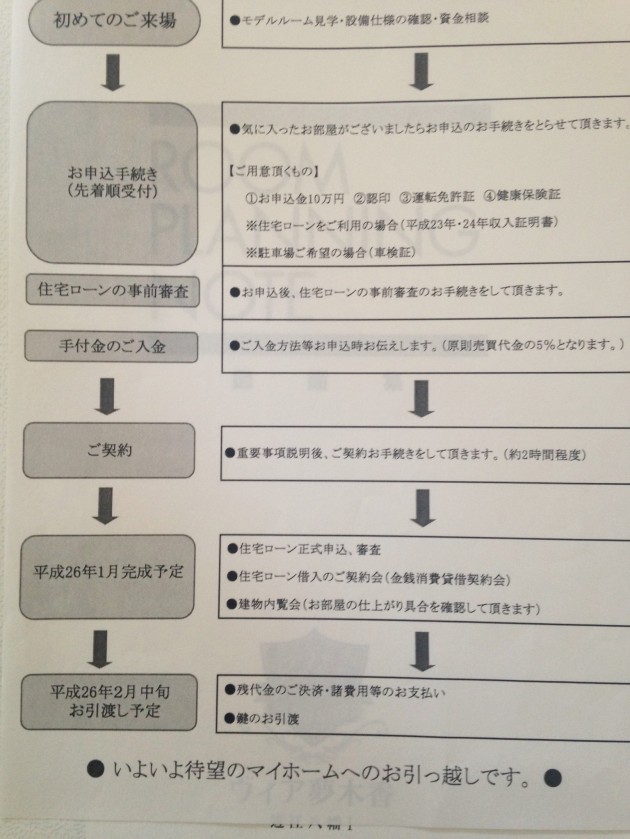
Visit the model home—> Apply to buy, Get screened for loan approval, and Pay deposit—> Sign contracts—-> Complete loan paperwork—-> Pay fees and move in!


The model home was beautiful, the price was right (especially with no down payment), and the agent had a pretty good sales pitch  so we were pretty much sold. We headed over to Masa’s parent’s place right afterward to get their advice and make sure we weren’t getting tricked or swindled.  The both said it seemed like a good idea, and agreed to visit the place with us the next weekend.   We called the agent (who would be our main contact through the entire process)  and scheduled a meeting to visit the model home again and get more details.

Best professional icebreakers for small groups, eikaiwa classes, and English business classes.


Teaching in a professional setting can be difficult. You want your students to have a good time and start talking, but you also want to keep it professional and comfortable for your shyer students. Here are 5 tried and true ice breakers that totally fit the bill!

excited-happy-young-adults-15202458

1)      Pick a Coin-

Get a handful of coins, spread them out on the table, and have students randomly pick one. They must talk about something that happened to them or what their life was like that year. Be sure all the coins have different years.


2)      Fun Questions– This is a list of fun questions that don’t delve too much into private information and can be a fun starting point for conversation.  If you are teaching an English class, this is a great way for students to try out all different sorts of vocabulary.


If you could choose your age forever what age would you choose and why?

If you were stranded on a desert island what three items would you want to have?

What is your favorite object that you already own?

If you could live anywhere in the world with unlimited money where would you live?


3)      2 Truths and a Lie– this is a universally known, tried and true ice breaker that is fun but can still stay professional. Have each person make three statements about themselves. Two must be true and one must be a lie. The other group members must guess which is true or a lie.


4)      Ten Things in Common– The group has to find 10 things that they all have in common. This one is surprisingly fun and lets your group members learn a lot about each other. This also great if this is an English class as they have to go through lots of vocabulary. Warning: This icebreaker can take a long time. Be sure you have a few suggestions that most of your students will have in common i.e. liking ice cream, liking vacations, etc.


5)      Back to back – have your group form teams of two. Have them sit back to back. Give one group member a simple line drawing and give the other partner a  blank sheet of paper and pencil.  The partner with the drawing must describe the image to the other partner WITHOUT telling what the actual object is.

yikBn6RiE


For example “Draw an  oval with pointy ends. Draw a black stripe at the top and one at the bottom” and so on and so on. 
You will be surprised at the results. This exercise is great for communication practice and is also a lot of fun!

What do you do when you have no money for fare adjustment on JR?

Synopsis: What happens when you need to do fare adjustment on JR (Japan Railways) and you have no money? They will probably just let you go through if you explain it to them nicely.

I have a really cute pink purse that I love but rarely take out because it is too small to hold the dozen things I like to carry around with me- my wallet, iPad, mirror, make up, headache medicine , ICOCA (train pass) card and so much more. I was having a girls -night one night and I really wanted to dress up and use that purse. I decided to not bring my large wallet and just packed 9,000 yen, my ATM card, my ID, and makeup.

We had a great time eating Brazilian BBQ and later ended up doing karaoke.  My cash was all gone by the end of the night. I headed home and entered JR with my ICOCA card and didn’t pay attention to the balance on the card.

The train pulled up to my station at about midnight. I started to walk through the ticket gate, but was surprised when it shut on me and saw that I had insufficient balance. I headed over to the fare adjustment machine, opened my purse, and dropped my jaw when I saw that I had no cash.  I looked out past the gates to see if the station convenience store was still open in the hopes that I could use the ATM, but it was closed.

I had no money, no way to get money, and didn’t know what to do. Should I lie and tell them I lost my ticket and didn’t have any more cash? Should I sneak through? In the end I decided on the truth.  I figured I would let them know that I was about 300 yen short and ask if I could run to another convenience store and bring back the money I owed. I figured they could hold on to my ID as collateral. I stepped up to the woman at the gate and explained my situation as I handed over my card. She was really nice and said it was no problem. She deducted the all the money that I had on the card. Told me not to worry about the 300 yen I owed and let me through.

So if you ever find yourself in a similar situation as me, just be honest and let them know.   I think they will be pretty cool about it.